
3 Ways to Use Tito With Zoom
With many in-person events moving online, we’re seeing an influx of requests for how to use Tito with video conferencing platforms, especially Zoom.
In this article, we’ll give you three options for how to get set up so you can sell tickets on Tito and run your event on Zoom.
You could also adapt these methods for use with other video streaming platforms depending on how they work, and whether they connect to Zapier.
Contents
Methods are listed in order of most basic to more complex.
Quick background
Feel free to skip this part if you just want to get straight to the tutorials. 😉
- As you may know, we’re currently building our own community and live-streaming platform called Vito. It’s very different to Zoom, as some of you will already know if you saw it in action at Admission Online. We’re currently working on getting Vito ready for public launch, but in the meantime (and beyond) we want to make it as easy as possible for people to use Tito with the video platform of their choice, whether that’s Zoom, Vito or something else entirely.
- You may read this post and wonder why we don’t have a Tito + Zoom out-of-the-box integration. We’d like to build one, but first we need to finish up a project we started pre-pandemic to update our checkout and widget — which will bring lots of other exciting changes (watch this space)! In the meantime, we suggest the following workarounds.
- All these methods assume you already have a Tito account and a Zoom account and are familiar with both platforms at a basic level. If you need to brush up on either system, you can check out Tito’s documentation here and Zoom’s documentation here.
OK, let’s get on with the tutorials!
Custom message (+ optional password)
This is good for cases where you’re happy to issue a single Zoom link to attendees, and have them optionally enter a password to gain access.
Pro: It’s extremely easy to set up.
Con: It’s not super secure, as people could share the link and/or password.
How to do it
- Schedule a Zoom meeting or webinar and customise it to your preferences, including setting a password if required, and copy the link.
- Create your Tito event and tickets.
- Edit your ticket and scroll down to where it says Custom Message, and then paste in the Zoom link and information to join your meeting, and save.
- Start selling tickets!
The end result
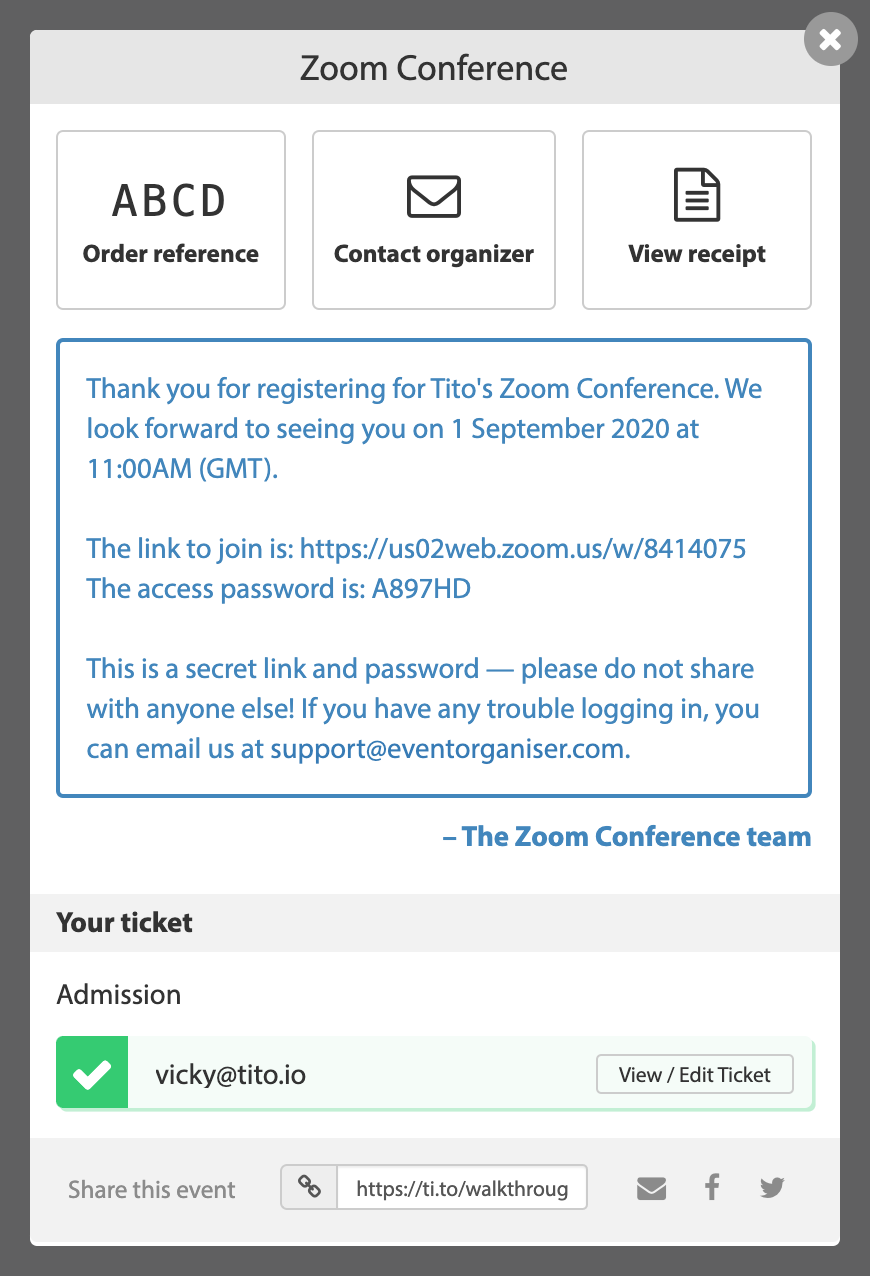
This is about as basic as it gets, and great if you just need to get started quickly and aren’t too concerned about the link being shared. This method would also be very easy to use with any video conferencing platform, not just Zoom.
For more details about how and where to add the custom message, and all the places it will be displayed to attendees, check out this page in our help documentation.
Export and import
This method is useful for when you just want to start selling tickets right away, and don’t want to worry about getting attendees into your video conferencing platform until a later date.
Pro: Also very easy to set up, and gives you lots of flexibility to change your mind about which platform you want to use.
Con: It’s a completely manual process, so you’ll need to remember to do the import(s) when you’re ready to send out Zoom invitations.
How to do it
- Set up your Tito event as normal and start selling tickets. Optionally you could add a Custom Message to the ticket (as explained in the first method) to let people know that they can expect a Zoom link nearer the time of the event.
- When you’re ready, perform an attendee export from Tito by clicking on the cog icon above the search bar and selecting Export.
- Edit your downloaded sheet so it just has the following columns in order: Email, First Name, Last Name (make sure the headings match, so that Zoom can read the file), and save as a CSV file.
- Head to Zoom, create your webinar and go through all the settings as normal until you’re happy with them. When you’re ready, select Import from CSV at the bottom of the page. Make sure you check the box that says Send invitation after importing otherwise the attendees won’t receive their access link. Import the CSV file and you’re good to go.
Unlike the first method, this allows you to send unique invitation links to each attendee, so it has the dual advantages of still being fairly straightforward while also being more secure.
The only compromise is that it’s a manual method. The final approach shows you how to automate this process — the trade-off being that there’s more technical setup involved.
Automate with Zapier
This final method we’re outlining is the most robust, with the caveat that there’s a bit more configuration required, though still nothing too outlandish or requiring coding. It also requires you to use Zapier, a third party service that acts as a connector to help automate processes between different platforms.
Pro: Secure and automated so that the attendee receives their personalised Zoom link right after confirming their ticket.
Con: Little bit fiddly to set up compared to the other options, and requires a paid Zapier account.
How to do it
This method builds on another tutorial we posted a couple of years ago, which includes screenshots in case any of the following steps get a bit confusing!
- Set up your Tito events and tickets and schedule your Zoom webinar as normal.
- Create a Zapier account if you don’t already have one. This guide is a good primer to understanding how the service works.
- Within Zapier, click the black Make a zap button. Give your Zap a name if you like.
- In the search box under Step 1, search for “Webhooks by Zapier” and select it when you see it.
- Click on Catch hook and then on continue.
- You’ll be shown a URL. Copy this and head over to your event in Tito. Navigate to Settings > Webhook endpoints, then click on New Webhook Endpoint. Paste the URL in from Zapier, and then make sure the only box checked is the one that says
ticket.completed. Save. - Return to Zapier and hit continue.
- You’ll be prompted to test your trigger. To do this, first put through a test order in Tito and be sure to confirm your ticket in the email. Then hit the blue Test trigger button in Zapier and you should see a success message. Proceed to Step 2 on screen.
- This time in the search bar in Zapier, enter “Zoom” and select it when it shows.
- Select Create Webinar Registrant and hit continue.
- You’ll be prompted to connect Zapier to your Zoom account if it isn’t already, otherwise you’ll be prompted to select your account if you’ve already connected it. Hit continue when you’re ready.
- Select the relevant upcoming webinar from the dropdown menu. The first name and email address should be populated automatically with the data from your test trigger. Set confirmation email to true. Hit continue.
You should now be good to go. Put through a test order, hit confirm when the email comes through from Tito, and a minute or two later an invitation email should come through from Zoom with a link to the webinar.
One thing to note is that the Zoom invite will not go out until a ticket reaches the complete state — this means it has been assigned, and that person has agreed to the data protection terms (if present) and answered any required questions you’ve set up.
This method may also be adaptable for video conferencing platforms other than Zoom. You may just need to experiment with tweaking some of the steps above. Best of luck getting set up!